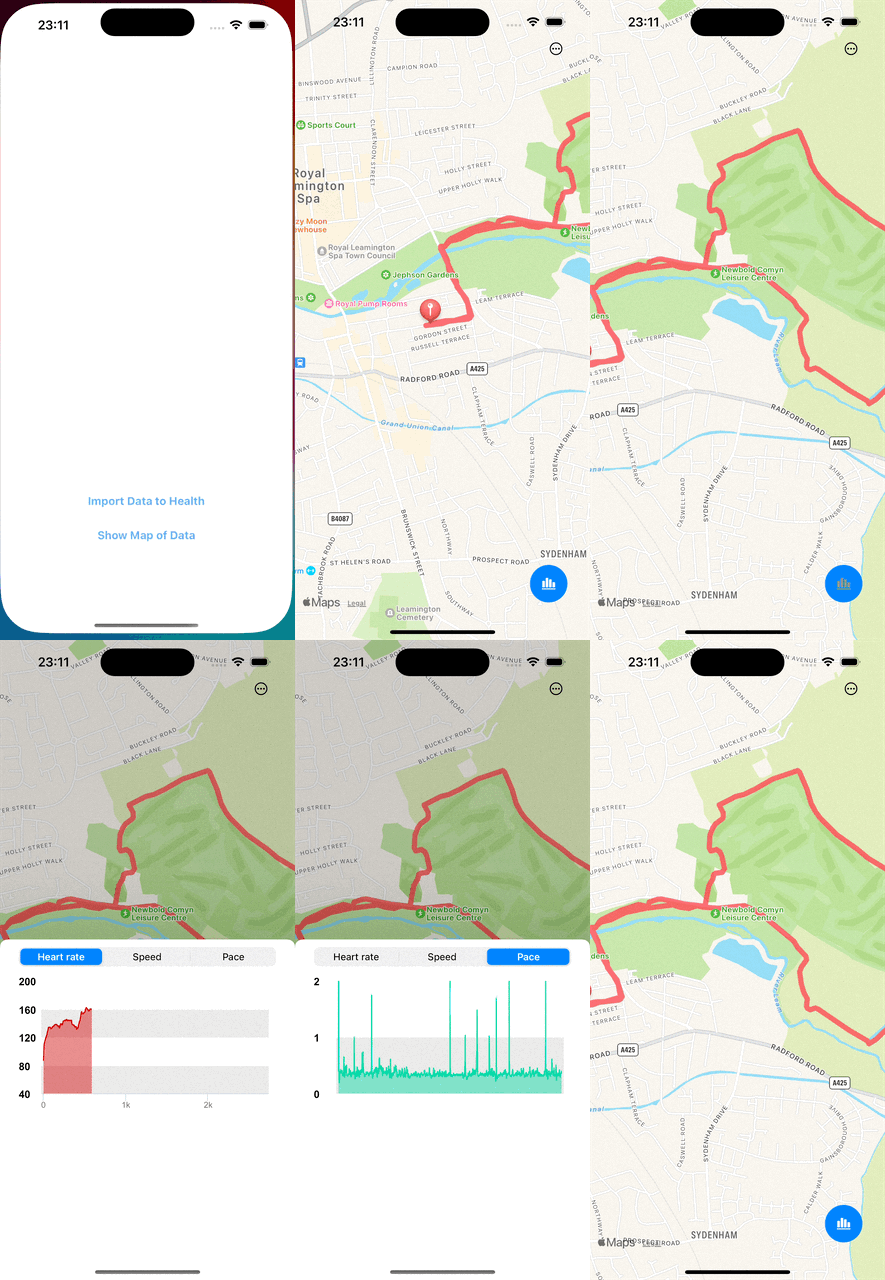
Things I want to accomplish: ✅
1. Get data from XML file into HealthKit
2. Show HealthKit workout route on the map
3. Visualize Heart rate and Speed/Pace
One of the most exciting breakthroughs in modern tech medicine is getting your physical data, biometric data into the EMR (electronic medical record) and into your doctors hands. It first arrived on the mobile market with HealthKit. HealthKit was introduced by Apple in iOS 8 (mid 2014), a framework that enables developers to interact with health and fitness data on iOS devices. It acts as a centralized repository, collecting data from various sources such as the iPhone’s built-in sensors, third-party devices, and user input. This wealth of information includes but is not limited to steps taken, heart rate, sleep patterns, nutrition, and more. The user has granular access control and it’s all opt-in. Data storage of it doesn’t need to be HIPAA compliant and it is the consumer’s responsibility to keep their data secure.

Configure HealthKit to opt-in
To use HealthKit, you must enable the HealthKit capabilities for your app. In Xcode, select the project and add the HealthKit capability (see 🔎 Wourkout Detail demo). Only select the Clinical Health Records checkbox if your app needs to access the user’s clinical records. App Review may reject apps that enable the Clinical Health Records capability if the app doesn’t actually use the health record data.
To make your code maintainable and clean, let’s create a HealthKit Manager class. This simple class is responsible for retrieving and updating data to the HealthKit.
The HealthKit manager will use HKHealthStore entity to interact with the HealthKit. After this I create a function to request User’s authorization to use the Health data in my application. In this step I prepare a set of datatype to read and write (in demo only read data is needed). This data type is in .gpx file which is an XML file format for storing coordinate data and health records (like heart rate and speed). Since we are dealing with prerecorded workout file .gpx we don’t need the Health data when application is in background mode.
Raw data .gpx --> HealthKit --> (opt-in) UI
Note: see full configuration list - Apple documentation
Getting into workout route
To accomplish visualization of workout route this steps were needed:
1. Add the samples (.gpx) to HRWorkout instance and then route locations
2. Get stored data from HK with query
3. Draw route on centered map with MKPolyline
We are going to use the HKAnchoredObjectQuery to register for changes, because as Apple said:
Anchored object queries provide an easy way to search for new data in the HealthKit store. Below function will receive the types that you want to register for changes and will register each one.
    func getRouteValuesFromHealthKit(completion: @escaping (([CLLocation], Error?) -> Void)) {
        var totalWorkouts: [CLLocation] = []

        let query = HKAnchoredObjectQuery(type: HKSeriesType.workoutRoute(), predicate: nil, anchor: nil, limit: HKObjectQueryNoLimit) { (query, samples, deletedObjectsOrNil, newAnchor, errorOrNil) in
            guard let samples = samples, let _ = deletedObjectsOrNil else {
                #warning("Add alert for when notauthorized")
                return
            }
            guard samples.count > 0 else {
                os_log("Error samples are 0")
                return
            }
            let route = samples.first as! HKWorkoutRoute

            let routeQuery = HKWorkoutRouteQuery(route: route) {
                (query, locationsOrNil, done, errorOrNil) in
                if let error = errorOrNil {
                    os_log("Error \(error as NSObject)")
                    return
                }

                guard let locations = locationsOrNil else {
                    #warning("Handle in UI if no locations found")
                    fatalError("*** NIL found in locations ***")
                }

                locations.forEach {
                    totalWorkouts.append($0)
                }
                if done {
                    DispatchQueue.main.async {
                        completion(totalWorkouts, nil)
                    }
                }
            }

            self.store.execute(routeQuery)
        }

        self.store.execute(query)
    }
In our implementation, we simply batch up all locations until we’re done, then store them using the newest locations. The locations are represented as CoreLocation types, which makes them easy to ingrate with other parts of the Apple developer ecosystem, such as MapKit. You could display the route on a map or use Geocoding to convert the coordinates into more human-friendly descriptors.
Getting into health data
To accomplish visualization of our workout speed, pace and heart rate values we can use native CareKit (CareKit only provides the bar charts, however, we can integrate other chart libraries in SwiftUI) or external AAInfographics framework for UIKit.
So what do I need to have to visualize my workout data?
Firstly parse the values from import.gpx file in this case heart rate or speed values and save to HealthKit. Pace is calculated according to duration and distance Pace (sec/km) = time (sec) / distance (km) from HealthKit store directly.
    // MARK: - Heart rate
    func setHRValueToHealthKit(_ type: HealthValueType, for model: [GPXLocation]) {
        var heartRate: Double = 0.0
        let unit = self.getUnitForType(type)
        guard let sampleType = HKObjectType.quantityType(forIdentifier: getIdentifierForType(type)) else {
            return
        }

        model.forEach {
            heartRate = $0.heartRate

            let quantity = HKQuantity(unit: unit, doubleValue: heartRate)

            let heartRateSample = HKQuantitySample(type: sampleType, quantity: quantity, start: self.workoutList.first!.startTime, end: self.workoutList.last!.startTime)

            self.samples.append(heartRateSample)

            DispatchQueue.main.async {
                self.store.save(heartRateSample) { (finished, error) in
                    if !finished {
                        os_log("Error occured saving the HR sample \(heartRateSample).The error was: \(error! as NSObject).")
                    }
                    os_log("Saving the HR sample \(heartRateSample).")
                }
            }
        }
    }
In demo case we import AAInfographics_Pro and use appropriate UI diagram chart .chartType(.areaspline) to generate diagram views.
Note: If you notice I am using os_log OSLog is a replacement for print, and NSLog and Apple’s recommended way of logging easily visible in Xcode console.
Conclusion
That’s all I’ve found in the last days studying the HealthKit and charts framework. I’ve covered all situations that my context required, which were: save objects and sync them between my app and Health app and show them on the graph and map. Hope you guys enjoy it, and any inconsistencies in the content above please let me know.
Full demo Github
To follow the newest updates on Apple watch and HealthKit here
Helpful link for HealthKit code-gen with ChatGPT